
Fast Hyperlinks
-
Area of Hopes and Goals
-
- Fort City Go to #1/Silver Card
Deltarune has been in improvement for a very long time, and after 4 years of ready, the content material within the recreation is getting doubled with the discharge of Chapters 3 and 4, which means we now have work to do.
Toby Fox made Undertale with the thought of locking you out of content material based mostly in your decisions, and Deltarune obtained that very same remedy, although it is to a lesser extent.

Associated
10 Criminally Underrated Indie Video games You Want To Play
These indie gems deserve your time and respect!
You are allowed to return and get stuff from earlier chapters that you might have missed, and understanding Toby, these one-time collectibles and fights you get locked out of later might come into play.
I will checklist each considerably necessary, missable factor you’ll find in Chapters 1 and a couple of so as, as they is perhaps helpful in a while, and will come into play as quickly as Chapters 3 and 4.
??????
Glowshard #1

The very first thing you’ll be able to miss can be the primary merchandise within the recreation. Proper as you get into the Chapter 1 darkish world, you will come throughout a fork within the street, and heading down and inspecting the wall offers you the shard.
There may be one among these in each chapter, and whereas they can be utilized to immediately spare a Rudin, they improve in value with every new Chapter, so you are higher off hoarding them and promoting them round Chapter 6 or 7.
Area of Hopes and Goals
Damaged Cake/Spin Cake
The Damaged Cake may be discovered simply on the primary path, however you’ll be able to’t eat it. As an alternative, as soon as you discover Malius within the Scarlet Forest, get him to restore it, then backtrack to the High Chef the place you discovered it, or wait till Chapter 2’s Fort City.
Whereas the High Cake is extremely highly effective, it is one-time use, so giving it to the High Chef in trade for the infinitely renewable Spin Cake is a choice that pays off in the long term, particularly as a result of it will get stronger every chapter.
White Ribbon

The White Ribbon is difficult to overlook, being inside a chest you see from the second you enter this display within the Area of Hopes and Goals, but it surely’s very important that you simply go down and to the left to seize it and hold it for later.
It merely will increase protection and makes Ralsei say one thing lovely if you equip it to him, however in a while, if you get one other ribbon, you’ll be able to fuse them and make an unbelievable merchandise.
Damaged Key C
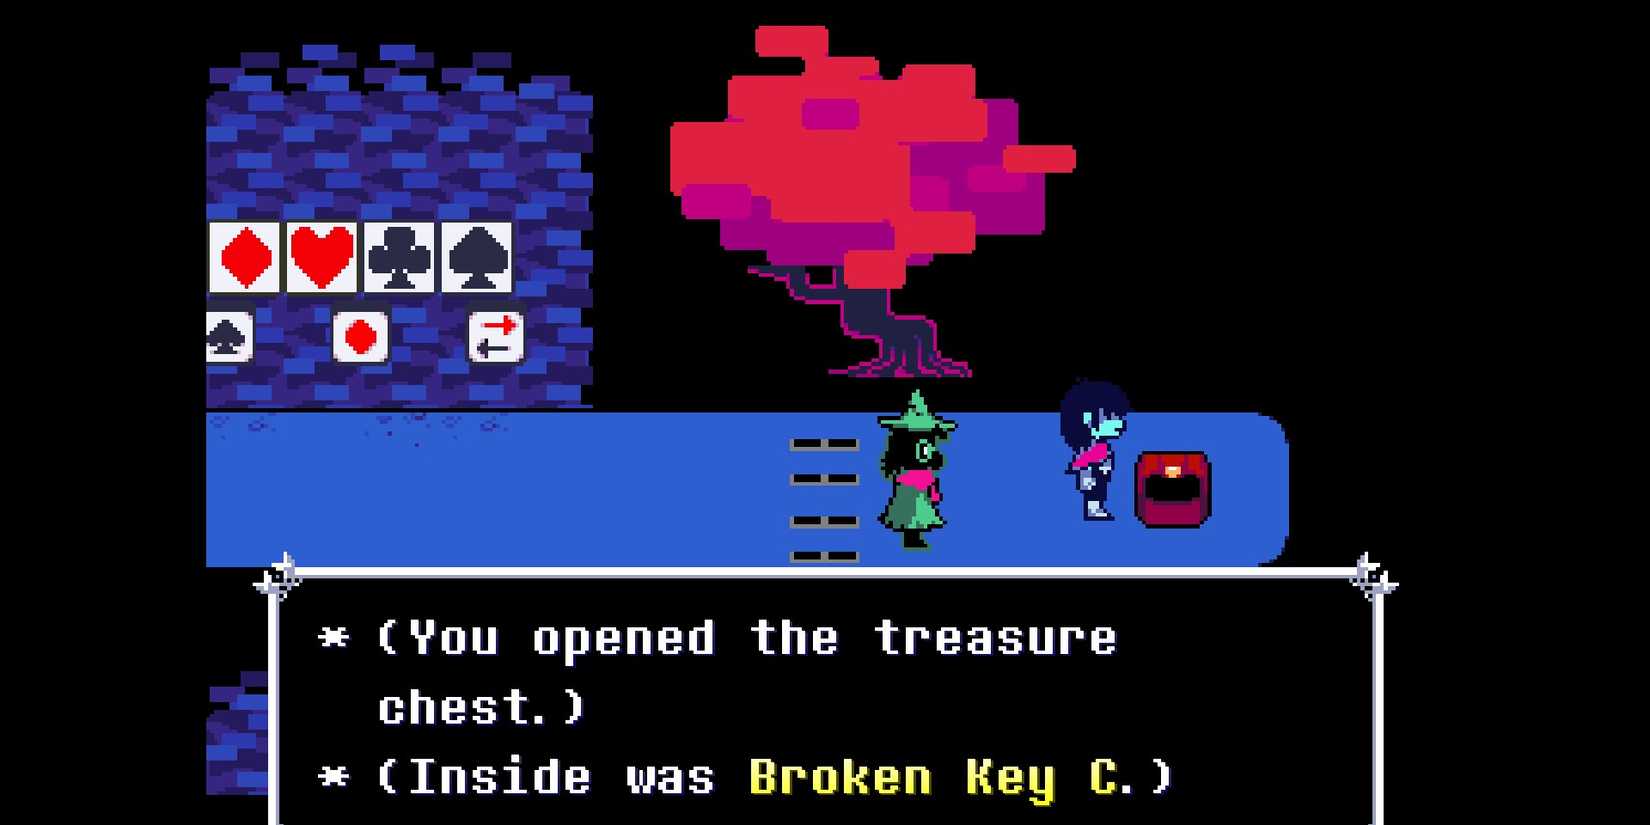
This can be necessary later within the chapter after we tackle Jevil, so that you would possibly as properly keep away from the backtrack and get it now. The third Key ingredient is accessed via a code, within the room above the doorway to the chessboard.
To get to the chest, it’s essential enter the sample of Diamond, Coronary heart, Membership, Spade. This is similar sample offered within the Card Fort, however you are capable of enter it earlier than getting there.
Scarlet Forest
Ragger

Proper after consuming a little bit of Salsa from a tree stump and recovering out of your section the place you thought Undertale was cringe, you will come throughout enemies swinging diamonds round in a circle sample.
Transfer in sync with the diamonds, and head upwards to seek out the Ragger. That is an assault merchandise for Ralsei, who may be very dangerous at attacking, however if you wish to defeat Jevil with violence, that is the best way to go.
Cube Brace

After Lancer and Susie take their blueprints away, there’s one other go well with sample puzzle within the subsequent room, and whereas you’ll find the answer in that very same room, I will simply inform you it is Spade, Diamond, Membership.
This offers you +2 DEF for any character, making it extremely helpful for the remainder of Chapter One, as most different protection choices are significantly worse.
Damaged Key B

This a part of the important thing to Jevil is fairly devious, as it’s essential go to the room the place you dodge all of the dancers, then make your option to the underside proper the place the ReviveMint is, then go down an invisible path on the backside of the Dancer Sq..
This takes you to a room with a really impolite encounter with three Rabbicks, and a path upwards the place you’ll be able to seize Damaged Key B, sarcastically cementing that we’re gathering these within the reverse order.
Starwalker/Egg #1
These two are type of in the identical room, so I will inform you the right way to do each. Get via the room the place the flying star shoots projectiles at you, then head backwards to speak to The Authentic Starwalker, who could have a cameo in Chapter 2 later.
Go to the subsequent room, then return to the Starwalker room, and repeat till you find yourself in a room with a lone tree. Work together with the highest of the tree to speak to a person, settle for his provide, and get an egg, which is not too necessary, and is not too unimportant.
Iron Shackle/Moss

After you get thrown in Jail, you’ll be able to instantly seize the Iron Shackle, a deceptively nice merchandise that grants you further assault and protection, which is someway top-of-the-line gadgets proper now. There’s additionally moss, in order for you moss.
In a while, if you get to Fort City in Chapter 2, you’ll be able to fuse the Iron Shackle with a Glow Wrist to make the Spike Band, which makes it give much less protection in trade for extra assault energy.
Card Fort
Damaged Key A/Jevil
Return to the elevator that took you out of jail, and if you work together with the buttons, you will see a brand new ?????? possibility has proven up, which can take you all the best way all the way down to the basement.
After interacting with the door, return to Seam’s store, and get the ultimate Damaged Key half from him, and purchase at the least two Amber Playing cards whilst you’re there. Head over to Mallius to have him repair it up, and you will be able to battle the first and hardest Superboss in Deltarune.
Fill up on well being gadgets, completely get the Spin Cake if you have not already, and equip all of your get together members with protection gadgets, such because the Amber Card from Seam’s store, earlier than getting into.
You want to select right here, because you get the Shadow Crystal both approach, however there are two mutually unique gadgets from Jevil given to you for both pacifying him or defeating him with violence.
Should you battle him, you get the Satan’s Knife, which might solely be geared up by Susie, giving her further Assault, Magic, and a reduction on Impolite Buster, which is nice if she’s your principal harm supply.
Should you as an alternative tire him out and use Ralsei to pacify him, you get Jevil’s Tail, which may be geared up on any get together member, offering a good enhance to Assault, Magic, and Protection, and is usually the higher possibility.
Dainty Scarf/Courageous Ax

Whereas Rouxls Kaard comes with you in Chapter 2, he was far too impolite to arrange his store with banger music anyplace else, making the Courageous Ax and Dainty Scarf Chapter 1 unique gadgets.
The Ax is just a very good weapon for Susie, as you do not have something higher at this level. The Scarf, nevertheless, has Ralsei lose some assault in trade for magic, and, because the devoted healer, that is an extremely good commerce.
Diverging Routes

Now could be the purpose the place you probably have to make an enormous choice. Whereas it isn’t as blatant because the no-mercy route in Undertale, the routes in Deltarune diverge by both killing at the least one enemy or sparing each single one.
This offers you a barely completely different ending with the king both being carried off by his topics or put to sleep by Ralsei. Given how the bizarre route evolves in Chapter 2 and the three routes of Undertale, I would say it’s best to make two completely different saves for violence or pacifism, as dedication to both could also be necessary in a while.
Should you needed to go the pacifist route however by accident let Susie harm simply one of many enemies, you’ll find that enemy of their room within the Card Fort and apologize to them, which will get you again on the pacifist route.
Both approach you go, when you head again to the sunshine world, there aren’t any save factors, and ending the Chapter will lock in your new decisions to your save file if you return to Chapter 2.
Associated
10 Finest Pixel Artwork RPGs
You do not want hyper-realism to have enjoyable!
Chapter 1 Mild World
Go to Everybody
Earlier than we go to the subsequent chapter, there are a number of interactions you’ll be able to have within the first chapter’s transient Mild World phase that lock you out of some very cool interactions in Chapter 2 in case you do not begin them now.
You possibly can speak to Undyne and see that she does not even know Alphys, go to Rudy within the hospital, and go to the bunker on the backside of city that occurs to be taking part in the noise from Entry #17, however slowed down by 666%.
Except for that, it’s essential speak to Sans and say sure to hanging out along with his brother, knock on what’s presumably Mettaton’s door a number of instances, and sit by the ocean for some time to speak to Onionsan, for necessary dialogue within the subsequent chapter.
Optionally, you’ll be able to speak to Asgore, then go into the again of his store, and work together with the fridge to place the egg from earlier inside. I’ve no clue if that is what you are imagined to do with the egg, however there’s one thing related in Chapter 2, so I selected to do it.
If you would like a enjoyable scene at the beginning of Chapter 2, speak to Noelle by the gate and inform her about Susie, then inform her that she eats chalk. After this, you’ll be able to go flush the bathroom a dozen instances, then fall asleep, ensuring to observe the credit to save lots of your progress.
Chapter 2 Darkish World
Fort City Go to #1/Silver Card
There is not a lot that is essential to do in Fort City proper now, as you will get to go to it later, however there are some things. Particularly, some unique dialogue from Toriel and Alphys in case you head down with the Trash Orb, and unique Seam dialogue about Jevil.
Except for that, you lastly have entry to some prolonged storage, so make sure you stash away your Glow Shard and some other gadgets you wish to hold, and fuse two Amber Playing cards right into a Silver Card for more money all through Chapter 2.
Cyber Area
Glow Wrist

As the primary merchandise within the Darkish World correct, the Glow Wrist may be very simply discovered by simply going to the suitable on the pathway earlier than the primary Teacup experience, and offers a good +2 DEF.
It is a positive alternative in case you misplaced one among your Amber Playing cards as a result of Silver Card earlier, however in any other case, it is best used as a fusion with the Jail Shackle after we get again to Fort City.
Fiber Scarf

After Ralsei offers you a fast tutorial on the implications of violence, head up and to the suitable, then resolve a easy puzzle the place you spell APPLE, with a Fiber Scarf because the prize. And Nubert. Nubert can be there.
The Fiber Scarf offers +2 Assault and +2 Magic, which could appear higher than the Dainty Scarf, and whereas that is true in case you use Ralsei for attacking, the Dainty Scarf nonetheless grants you bonus therapeutic that the Fiber Scarf does not have, so contemplate that.
Glow Wrist 2/Blue Checksmark 1
Whilst you most likely don’t want a second Glow Wrist, this chest continues to be considerably necessary. Speak to the inexperienced mouse-pointer man by heading up simply after the room with the fellows promoting bagels, and he’ll process you with discovering Blue Checksmarks.
Instantly after, head via the primary set of falling bars, go down, and you will find a chest with the Glow Wrist, alongside your first Blue Checksmark, which is definitely an indication of evil if Twitter is something to go by.
Blue Checksmarks 2 and three

The second and third Blue Checksmarks are discovered within the sameish room. You will come throughout three completely different teacup rides, and whereas the third will take you additional into the Cyber World, the primary two are free rides to extra Checksmarks.
The primary makes you spell GIASFELFEBREHBER, which may be very simple in case you begin on the highest left and head down, and the second is simply in a chest. Return and speak to the hacker man, and he’ll find yourself in Queen’s Mansion and Fort City later.
Mecha Saber/Auto Axe

As soon as you’ve got danced with The Guys, you’ll be able to hit up their store and get two fairly first rate weapons, the Mecha Saber for Kris and the Auto Axe for Susie, that are nice to have in case you’re utilizing violence.
The Mecha Saber is presently one of the best weapon within the recreation for Kris, however the Auto Axe is much worse than the Satan’s Knife, given that you simply selected to assault Jevil as an alternative of getting the Satan’s Tail.
Stress Bit

Within the room after the store with the dancing save icon, you’ll be able to go up and to the suitable, then head all the best way down for the Stress Bit, a one-time use merchandise that provides you 32% TP immediately if you’re in battle.
Whereas that is nice and all, don’t use this in battle. It may be fused with an merchandise we’ll get later to make top-of-the-line equipment within the recreation, and also you lose the prospect to try this fully in case you lose it.
Ragger 2

On the subsequent, very massive Teacup experience, it’s essential lock in and hit each single arrow, which is a wrestle in case your depth notion is as dangerous as mine. Should you handle to get all 70, you will be rewarded with the Ragger 2.
It is a straight improve to the Ragger from Chapter 1, with a really excessive assault stat, and the disadvantage of lowering magic. Even in a No Mercy run, I would truthfully nonetheless suggest towards it, but when it is your fashion, go for it.
Cyber Metropolis
New Save

After Kris is cut up up with the others, you can begin the Bizarre Route. Whereas I favor beginning a brand new save fully devoted to doing a No Mercy run, you are capable of copy your save right here because it’s the place to begin.
I will go over the route intimately after we end the primary route, but it surely entails utilizing Noelle to freeze each single enemy, alongside many dialogue decisions, with a number of gadgets being mutually unique to both route.

Associated
Undertale: 10 Finest Characters, Ranked
From Sans to Flowey and Papyrus, listed here are among the best characters from iconic RPG Undertale.
Pink Ribbon

When you and ViroViroKun efficiently exposit to Noelle about how battles work, head down and to the left, the place you will discover a small alleyway with the Pink Ribbon inside.
Irrespective of which route you are on, it’s best to completely get this. It is not good for protection, but it surely will increase your Graze space considerably, letting you get far more TP for spells and therapeutic, alongside an amazing fusion later.
As an apart, something you equip to Noelle will grow to be inaccessible when you get to Fort City, so in case you give her the Pink Ribbon, make sure you take it again earlier than you permit the Cyber World.
Bounce Blade

In the identical room the place you will get a yummy shoe and Noelle-flavored tea, you’ll be able to head to the underside, previous a ViroViroKun, then open up a chest to get the Bounce Blade.
It could appear dangerous at first, with considerably much less assault than the Mecha Saber, but it surely has the upside of giving +1 Protection, and as an enormous fan of Blade Bouncing, it appeals to me.
Moss 2/Egg 2
Whereas within the visitors room with purple and yellow vehicles, get previous the purple vehicles, then press each buttons, heading down and to the suitable into just a little hallway with warning indicators. Whereas the yellow vehicles are nonetheless stopped, head additional down, and enter the hallway on the left.
Head to the left room, get mogged by Toby Fox himself, then you definately’ll be in a room with free moss. As with the Chapter 1 egg room, exit and re-enter this room till you are in one other room, with one other tree, and one other man who offers you one other egg in case you say sure.
Automotive NPC

It is a small and silly factor, however in case you dodge all of the vehicles whilst you’re driving with Queen and Noelle, you will get just a little automobile NPC again in Fort City. The best approach to do that is to carry left and proper on the identical time. If you cannot do this, then L.
Queen’s Mansion
Massive Shot Bowtie/Royal Pin

After an extremely very long time with out something elective to seize, you’ll be able to enter the Café in Queen’s Mansion, the place you are capable of purchase each the Massive Shot Bowtie and the Royal Pin, in addition to the Spaghetti Code, which is not necessary however is only a good therapeutic merchandise.
The Royal Pin is sort of merely simply a superb piece of armor for any character, and whereas the Massive Shot Bowtie is barely underwhelming compared, it is an necessary fusion materials for later, so seize it now.
KeyGen/Damaged Sword

Now that you simply’re close to a quick journey door, now could be nearly as good a time as any to return to the rubbish dump, head all the best way left, and enter Spamton’s store. Speak to him first, then we are able to get to purchasing issues.
Purchase the KeyGen from him, and ensure to time your button press so you do not find yourself spending $48132 on the factor. You too can seize the Damaged Sword and Frayed Bowtie, which are not tremendous helpful now, however is perhaps sooner or later.
Chain Mail/Basement
After the encounter with the tall cat girl holding a whip, a mild reminder that this recreation is aware of its viewers, you will come throughout the Hacker after crossing visitors. He’ll inform you a few backdoor on this room, which it’s essential go searching for.
First issues first, the chest right here comprises Chain Mail, which merely offers you 3 protection, making it higher than most different armors for that stat particularly. To get to the backdoor, observe the Hacker, then work together with the item his cursor factors to when it adjustments to a hand.
Right here, you’ll be able to unlock a gate and activate a shortcut to the primary room. Enter the basement to the suitable, then head all the best way left to energy down the forcefield, and to take the toughest teacup experience of your whole life. It was tougher after I did it pre-patch, thoughts you.
Head again and go to the suitable, the place you will ultimately come throughout the lifeless physique of Mettaton NEO, with an Empty Disk inside it. We’ll be bringing this to Spamton in a while to begin one other superboss.
Glowshard #2

As you climb up Queen’s mansion, you will come throughout a room with butlers chasing and being chased by pots. You possibly can both ignore them or simply do the encounter, however both approach, head as much as the primary darkish door you see on this hallway.
Interacting with one of many cloches right here will spawn a UFO enemy that shoots at you, however in case you work together with all of them whereas being pelted with bullets, your reward can be one other Glow Shard to stash away till a later chapter.
Spamton NEO
Earlier than you head as much as battle Queen, because you’re by a shortcut to the underside flooring anyway, we would possibly as properly get the superboss carried out. Head again to the rubbish dump, present Spamton the Empty Disk, and he’ll load himself onto it so that you can use within the basement.
Be sure you’re prepped with nice therapeutic gadgets and among the revivals you bought on the leadup to Queen, then head again to the robotic physique the place you discovered the Empty Disk, put within the new one, and head out of the room to begin the boss.
The battle is not anyplace close to as laborious as Jevil’s, particularly with a free heal from urgent F1, however identical to him, you will want to select right here. You possibly can spare him by reducing his strings to get the Deal Maker, or assault him and get the Puppet Scarf as an alternative.

The Deal Maker is a superb piece of armor that grants 5 Protection, 5 Magic, and 30% more money from every battle, plus it may be geared up then again. The Puppet Scarf is an upgraded Ragger 2, granting Ralsei 10 further Assault on the expense of 6 much less Magic.
Until you are extremely devoted to killing, I would suggest towards utilizing violence right here, because the Puppet Scarf nerfs Ralsei’s capacity to heal into the bottom, and having a superb protection merchandise is definitely a much bigger shot at successful most fights.
Both approach, on the finish of issues, you will have a cool new merchandise and a Shadow Crystal that can be necessary later. You possibly can get a 3rd one within the subsequent chapter, if solely you had the Shadow Mantle…
There should not be anything left to get within the Darkish World, however do word that, versus Chapter 1, in case you save in Fort City in any respect, you will not be capable of backtrack to the Cyber World, and must replay the complete Chapter to get anything.
Fort City Second Go to
Chapter 2 All Stars and Fusions

Now that we have sealed the fountain, it is time to head again to Fort City for some enjoyable dialogue with our new Chapter 2 recruits, and an enormous heap of latest gadgets, primarily all these fusions I have been gassing up.
First issues first, you’ve got obtained at the least one battle left, with Jigsaw Joe’s Chapter 2 All Stars problem within the Get together Dojo. The primary rounds aren’t laborious, however preventing two Werewires directly is hard, and greatest carried out by always grazing to construct TP for Ralsei to heal.
This grants you a Stress Gem, which has similarities to the Stress Bit, in that it’s best to by no means use it in battle ever. It is one other TP restoring merchandise, however I’ve a really robust feeling it will be one other one-time use merchandise you want for a fusion later.

Talking of fusions, head to the High Bakery, and fuse your ribbons right into a Twin Ribbon, optionally your Glow Wrist and Iron Shackle right into a Spike Band, and your Massive Shot Bowtie and Stress Bit right into a Stress Bow.
The Twin Ribbon is an unbelievable accent that will increase your Graze Vary even additional, alongside 3 protection. The Stress bow is very good together with the Ribbon, because it offers further TP achieve alongside 2 further protection.
The Glow Wrist trades protection for assault energy, the DD-Burger is only a higher meals merchandise if in case you have Darkish Burgers, and the Twisted Sword is presently unobtainable, however it could be a bizarre route unique anyway.
Whilst you’re right here, you’ll be able to head to the café and admire the marginally completely different Swatch sprite within the LTS demo model, and see in case you obtained all of the recruits, which is extremely simple to do in your common pacifist route, but it surely does not harm to test.
Cease by Seam’s store for some extra unique dialogue, together with a obscure trace in regards to the Chapter 3 secret boss, see a cutscene between King and Queen, then head out of the Darkish World for good this time.
Chapter 2 Mild World
Revisiting Everybody
After that, there are much more errands to run on this mild world. Go to Rudy so he can meet Susie for the primary time, speak to Undyne and ship her field of goodies to Alphys, and head over to the Graveyard for a small scene with Father Alvin, who is unquestionably not The Knight.
Head down for a brand new scene on the undoubtedly Gaster-adjacent Bunker, then take a cease at Sans’ store, the place you will get a delay on the brother factor, and deposit the egg right into a basket of different eggs, in case you’re not hoarding all of the eggs for your self.
Knock on presumably Mettaton’s presumable door once more, and say you are there to see another person, the place you will be tasked with giving them leisure tomorrow. Whilst you’re there, sit by the seashore once more, and get some obscure foreshadowing in your system.
After that, you’ll be able to head again dwelling with full data that you’ve a most completion Pacifist save file able to go for the subsequent few chapters. Simply make sure that to observe the ending credit so it saves.

Associated
8 Finest Video games Like Undertale
Please Toby, we’re ravenous.
Bizarre Route
Beginning Incidient

If you would like to play the Bizarre Route (in any other case referred to as the Snowgrave Route), then proceed; in any other case, you are carried out. This route begins if you get Noelle in your group within the Cyber World; nothing you’ve got carried out earlier than this level issues to date.
As soon as she’s in your get together, backtrack as a lot as doable. Noelle will protest this, however hold ignoring her and hold heading left, utilizing her capacity, Ice Shock, solely to kill and freeze each enemy. You possibly can’t miss a single one, so test each single bit of each room for enemies.
Should you freeze the Werewire and ViroViroKun by Spamton’s store and listen to just a little sound impact, you are on the route. Now, select “Proceed,” persevering with to make use of Ice Shock and nothing else on the enemies, as defeating them usually or sparing them will abort the route.

When you freeze all of the enemies in any given room, you will hear that very same sound impact. Once you hit the Annoying Mouse Room, ignore the puzzle; as an alternative, attempt to go away the room. Ignore Noelle till you are given two decisions, then select to “Proceed.”
Once you attain the room with the Ferris Wheel billboard, speak to the shopkeeper on the suitable, and when prompted, reply with “We’re one thing else”. Should you aren’t supplied a hoop, go round and freeze each enemy you’ll find on this room, then return to the shopkeeper.
Freeze Ring
After strolling away, the shopkeeper ought to ask in case you’re concerned with a Freeze Ring. Reply “Get it” to each dialogue immediate, which can ultimately lead to Noelle utilizing her powers to acquire the ring, then blocking it out of her reminiscence.
If you would like this path to get much more tense, go to the signal and demand that Noelle experience with you on the Ferris Wheel. Afterward, go all the way down to the change, and when Noelle talks about feeling bizarre, inform her “It is pure”.
The remainder of the route is pretty easy. Equip the Freeze Ring onto Noelle, have her Ice Shock each enemy to dying, and reply with “Proceed” to each dialogue immediate you are given, till you get to the dumpster the place you beforehand discovered the egg and moss.
Thorn Ring
Speak to the dumpster, and Spamton will inform you a few ring you will get when you’re carried out killing all of the enemies. Be sure you get this counter to zero earlier than you go to the room with the Berdly battle, then communicate to Spamton once more.
Your final enemy ought to be one of many Poppups within the room with a bunch of rubbish cans, so freeze that and return to Spamton. He’ll promote you the Thorn Ring for $1997, and it’s essential equip it to Noelle earlier than you go see Berdly.
Aborted Snowgrave

If you would like, you’ll be able to cease after this level and spare Berdly. It will make the remainder of the route play out as regular, however you’ll be able to take the Thorn Ring off Noelle and hold it for your self. That is the one option to hold the ring, and could also be helpful for the Twisted Sword sooner or later.
Snowgrave
In fact, in case you’re right here to Proceed with the route, then freezing Berdly is the ultimate step. Do not use IceShock on him; as an alternative, defend and construct TP to 100%, then command Noelle to make use of her new transfer, Snowgrave, which you could have in case you geared up the ring.
She is going to refuse a number of instances, however hold commanding her to solid Snowgrave. She is going to then kill Berdly by freezing him in a big ice diamond, and stroll off-screen, with no approach out of this route now.
Spamton NEO DX

When you head up, you will see you’ve got virtually minimize out half the runtime of Chapter 2 by doing what you probably did. The fortress has been utterly overrun, most rooms are blocked off, and you have been utterly locked out of a ton of things.
After you ascend via the pipis maze and keep away from preventing Queen fully, you will be on a straight path to Spamton NEO. There is not a lot you are able to do to prep for this other than taking from the merchandising machine, so good luck.
In all of the Spamton fights, you’ll be able to press F1 for an prompt heal as soon as per save file, and on this one particularly, it is best to give attention to protection and utilizing X-Slash whereas topping up your well being occasionally.
As soon as his protection raises, simply ACT and name for assist, and whereas Kris does not handle to get Noelle’s consideration, you definitely do. From that frosty end, you’ll be able to seal the fountain and go dwelling, virtually like regular.
Proceed
The Mild World is all principally the identical, however if you go to Rudy within the hospital, you will discover a stark reminder of precisely what you’ve got carried out to Noelle’s psyche. If you want to additional freak her out, stroll in direction of her or put on her watch within the cutscene.
Except for that, you now have a True Pacifist save, a Bizarre Route save, and possibly an Aborted Bizarre Route save. Simply bear in mind to observe the ending credit as soon as once more to get the completion information to proceed into Chapter 3.

MORE
10 Deltarune Questions That Want To Be Answered In Chapter 3 & 4
These are the necessary questions that Deltarune Chapter 3 & 4 have to reply when it launches in 2025.

Deltarune
- Launched
-
October 31, 2018
- ESRB
-
Teen // Language, Suggestive Themes, Gentle Blood, Fantasy Violence
- Engine
-
gamemaker
- Prequel(s)
-
Undertale
- Variety of Gamers
-
Single-player